
Automated Tests in Node.js
If you're a web developer, you've heard about Node.js. Node is a JavaScript runtime that allows you to run JavaScript on the server, and many people are really excited about it, because it allows developers to treat JavaScript as a powerful, respectable programming language in it's own right, rather than a toy language used to add sparkly unicorns to webpages. Serious progamming languages need automated test frameworks, and Node is no exception.
However, getting automated tests in Node up and running is not easy, and the JavaScript community is moving so quickly these days that it's hard to keep up with the latest best practices. In the past, I found myself wishing for a tutorial that would get you up and running with automated testing in Node. Since I couldn't find one, I wrote it myself!
Mocha
Mocha seems to be the best-of-breed automated testing framework for Node today. It's extremely powerful and flexible — perhaps too flexible. Trying to understand all the options, bells, and whistles that it provides would take days! Nonetheless, it's very simple to get started. Let's say you want to write tests for this JavaScript function:
function increment(value) {
  if (typeof value !== "number") {
    throw "not a number";
  }
  return value + 1;
}
Then you'd write a test suite that looks something like this:
describe('increment function', function() {

  it('increments a positive number', function() {
    var result = increment(1);
    assert.equal(result, 2);
  });

  it('increments a negative number', function() {
    var result = increment(-10);
    assert.equal(result, -9);
  });

  it('fails on strings', function() {
    assert.throws(function() {
      increment("purple");
    });
  });

});
There are a few things to notice here:
- We use the
describefunction to create a suite of tests, grouping them all together. We can even provide a human-readable description of the thing or concept that all of these tests are about. In this cases, the tests describe the way that the increment function should be used. - We use the
itfunction to write a test. Just likedescribe, theitfunction also takes a human-readable description of what the test is about. It's best to describe the action or behavior that you're testing in this test. - We use the
assertmodule to check if a test passed or failed. This module is actually built into Node itself, so it's not actually a part of Mocha. Mocha has many other ways of doing assertions, but this is the simplest for getting started. - It's important to write tests for failure cases, too! When you write code,
consider how it might be misused, and be sure that your code can fail
gracefully. In this case, our
incrementfunction is really only intended to be used with numbers, so if someone tries to use it with a string, it should throw an error!
We'll put the increment function in a file called index.js. We generally
keep tests in a directory called test, so these tests can go in a file called
test/index.js. Now, how do we actually run these tests? This
is where Mocha comes in.
$ npm install mocha          # install mocha
$ ./node_modules/.bin/mocha  # run mocha
And we get some output that looks like this:
increment function
  1) increments a positive number
  2) increments a negative number
  3) fails on strings

0 passing (8ms)
3 failing

1) increment function increments a positive number:
   ReferenceError: increment is not defined
    at Context.<anonymous> (test/index.js:4:18)

2) increment function increments a negative number:
   ReferenceError: increment is not defined
    at Context.<anonymous> (test/index.js:9:18)

3) increment function fails on strings:
   ReferenceError: assert is not defined
    at Context.<anonymous> (test/index.js:14:5)
Well, Mocha found our tests, which is good. But Mocha did not find
the increment function that we want to test, nor did it find the assert
module. We can fix both of those problems with the
require function.
First, we'll add a line at the bottom of the index.js file, that looks like this:
module.exports = increment;
This indicates that the increment function should be available to other
JavaScript files via Node's require function. Then, we'll add two lines
at the top of the test.js function:
var increment = require('../index');
var assert = require('assert');
The first line loads the increment function we defined in the index.js file.
Note that we use a ../ in front to indicate that we want to load from a file
in the parent directory — remember that the test files are in their own test
directory. The second line loads the
assert module. There's no ../ in front, because we don't know where that
module is defined, and we don't care — Node can look it up for us, and just
return the result.
Now if we run Mocha again, we get much better results:
$ ./node_modules/.bin/mocha

increment function
  ✓ increments a positive number
  ✓ increments a negative number
  ✓ fails on strings

3 passing (7ms)
package.json
Node uses a file called package.json
to record metadata about your project. This metadata includes the project
name, dependencies, configuration information, and lots more.
We'll need a package.json file to hold information about how to run tests,
so we might as well create one now. Fortunately, npm has a tool to help
you do so! While you're in the same directory as your index.js file,
run npm init, and you'll see an interactive prompt that will help you
create your package.json file. It looks a little like this:
$ npm init
This utility will walk you through creating a package.json file.
It only covers the most common items, and tries to guess sensible defaults.

See `npm help json` for definitive documentation on these fields
and exactly what they do.

Use `npm install <pkg> --save` afterwards to install a package and
save it as a dependency in the package.json file.

Press ^C at any time to quit.
name: (learning-to-test)
version: (1.0.0) 0.0.1
description: via davidbaumgold.com
entry point: (index.js)
test command: mocha
git repository:
keywords:
author:
license: (ISC)
About to write to /private/tmp/learning-to-test/package.json:

{
  "name": "learning-to-test",
  "version": "0.0.1",
  "description": "via davidbaumgold.com",
  "main": "index.js",
  "scripts": {
    "test": "mocha"
  },
  "author": "",
  "license": "ISC"
}


Is this ok? (yes)
As you can see, npm init gives you some sensible defaults, but you can also
type in information, like I did for the "version", "description", and
"test command" fields.
Notice that there is a "scripts" section of the package.json file.
Since I indicated that the test command is mocha, the "test" script is filled
out. This allows us to run tests by running npm test,
which is much easier to remember than ./node_modules/.bin/mocha.
$ npm test

> learning-to-test@0.0.1 test /tmp
> mocha

increment function
  ✓ increments a positive number
  ✓ increments a negative number
  ✓ fails on strings

3 passing (8ms)
This project depends on Mocha, so we should add that information to the
package.json file, as well. npm install has two flags that will manage
that for you: --save and --save-dev. Use the --save flag for dependencies
in your code, and --save-dev for dependencies in your tests. For example,
to mark Mocha as a dependency for running tests, run this:
$ npm install --save-dev mocha
Once that's done, check your package.json file again, and you'll see that
Mocha is listed in the devDependencies section! Now we're ready to move on.
ES6
JavaScript is an evolving language, and new features and syntax are still being added to the language itself. ES6 is a version of JavaScript that adds many nice features that make JavaScript feel more like a powerful language, such as imports and classes. I prefer using ES6, but not all JavaScript interpreters know how to handle it correctly. Let's convert our code and tests into ES6 syntax, and see what happens! Here's the code:
export const increment = (value) => {
  if (typeof value !== "number") {
    throw "not a number";
  }
  return value + 1;
}
and the tests:
import { increment } from '../index';
import assert from 'assert';

describe('increment function', () => {

  it('increments a positive number', () => {
    const result = increment(1);
    assert.equal(result, 2);
  });

  it('increments a negative number', () => {
    const result = increment(-10);
    assert.equal(result, -9);
  });

  it('fails on strings', () => {
    assert.throws(() => {
      increment("purple");
    });
  });

});
Let's see how Mocha handles ES6!
$ npm test
/tmp/test.js:1
(function (exports, require, module, __filename, __dirname) { import { increment } from '../index';
                                                              ^^^^^^
SyntaxError: Unexpected token import
    at Object.exports.runInThisContext (vm.js:53:16)
    at Module._compile (module.js:513:28)
    at Object.Module._extensions..js (module.js:550:10)
    ...
Not very well, it seems. Fortunately, we can use Babel to
convert ES6 to ES5, which is the older style of JavaScript that Mocha knows
how to handle. Babel is a JavaScript compiler that integrates with many
different projects and frameworks in the JavaScript world. To integrate it
with Mocha, we'll install a package called babel-register, like this:
$ npm install --save-dev babel-register
Next, change the test script in the package.json file to use
babel-register, like this:
"scripts": {
  "test": "mocha --compilers babel-register"
}
Now Mocha will ask Babel to compile the JavaScript before Mocha tries to run the tests. Great! However, if you try to run the tests again, they'll still fail. This is because we haven't told Babel what it should do, so by default, it does nothing. Oops! Let's fix that!
Babel has lots of options, but let's stick with the presets, which are simple collections of features that you probably want. To get started, install the most recent Babel preset, like this:
$ npm install --save-dev babel-preset-latest
and then configure Babel to use it, by adding a babel section to your
package.json file. It should look like this:
"babel": {
  "presets": ["latest"]
}
Now try running your tests again:
$ npm test

> learning-to-test@0.0.1 test /tmp
> mocha --compilers babel-register

  increment function
    ✓ increments a positive number
    ✓ increments a negative number
    ✓ fails on strings

  3 passing (9ms)
That's more like it! Now you can write code in ES6 and still test it.
Debugging REPL
The problem with programming is sometimes, things go wrong. When that happens, the first step to fixing the problem is understand what is going wrong. Automated tests are great for identifing bugs, but to understand the root cause of the problem, you often need something more interactive, like a REPL.
A REPL, or "read-eval-print loop", allows you to explore the current state of a running program. When something is going wrong and you don't know why, you can use a REPL to look up variable values, run functions, examine exceptions, and even alter the state of the program if you wish. When I encounter a failing test, one of the first things I do to figure out why it failed, is to start a REPL right before the failure and examine why the code is misbehaving.
Fortunately, Node has a simple debugging REPL built-in, and Mocha knows how to use it! Simply add a debug argument
when calling Mocha to activate the debugger. We'll add another script to the
package.json file for this task, like this:
"scripts": {
  "test": "mocha --compilers babel-register",
  "test:repl": "mocha debug --compilers babel-register"
}
To run this script, we call npm run test:repl1, like this:
$ npm run test:repl

> learning-to-test@0.0.1 test:repl /tmp
> mocha debug --compilers babel-register

< Debugger listening on 127.0.0.1:5858
connecting to 127.0.0.1:5858 ... ok
break in node_modules/mocha/bin/_mocha:2
  1
> 2 'use strict';
  3
  4 /* eslint no-unused-vars: off */
debug>
You are now paused at the first line that Node runs, which happens to be the
Mocha script. This is kind of interesting, but not very helpful: when you're
debugging a failed test, you want to know about your code, not about your
testing framework's code. Let's exit the debugger by typing .exit
and pressing enter.
We need to tell the debugger where you want it to pause, so that you can easily
get to the code you're interested in. Fortunately, it's easy to do that: just
drop a debugger statement at the line where you want the debugger to pause.
For example, if you want to debug the third automated test in that test.js
file, you could add the debugger statement like this:
it('fails on strings', () => {
  debugger;
  assert.throws(() => {
    increment("purple");
  });
});
Then try running npm run test:repl again. You'll still start out paused at
first line of the Mocha script, but this time, type cont and press enter.
This will tell the debugger to continue executing code until it reaches a
breakpoint, such as that debugger statement. When it does, it will pause at
that breakpoint, like this:
debug> cont

<   increment function
<     ✓ increments a positive number
<     ✓ increments a negative number
break in test/index.js:24
 22
 23   it('fails on strings', function () {
>24     debugger;
 25     _assert2.default.throws(function () {
 26       (0, _code.increment)("purple");
debug>
Perfect! Now you're exactly where you want to be. You can inspect variables, run code, and set other breakpoints for further debugging if you need. It's unfortunate that you have to debug ES5 code from Babel rather than the ES6 code that you wrote, but that's just a limitation of the debugger, and as far as I know, can't be fixed right now. Node's documentation explains how to use the debugger, but the most important commands are:
- Type a variable name to see its current value
- Type
nextornto proceed onto the next line of code - Type
steporsto step into a function, andoutoroto step out of it
What does it mean to step into functions or step out of them? Let's say you're debugging some code that looks like this:
const inner = (name) => {
  console.log(`Hello, ${name}!`);
}

const outer = () => {
  inner("World");
}

debugger;
outer();
console.log("done!");
The debugger will start at the debugger statement, and the next line is
outer(). If you use the next command to proceed to the next line after that,
you'll arrive at the "done!" line — Node will execute the outer() function,
but it won't bother to show you what happened inside of that function. However,
if you use the step command to step into the outer() function call,
the debugger will arrive at the inner("World") line, and you can step
into that as well to arrive at the "Hello, World!" line. It makes a lot of
sense once you try it out!
Debugging with Chrome DevTools
Node's debugging REPL works well enough, but we have an even better tool at our disposal. As of Node 7.0, we can use the Chrome DevTools to debug code running in Node! These are the same debugging tools that you use for debugging JavaScript in the Chrome web browser, and they are a joy to use.
We need to pass two flags to Mocha to get this to work. The first one is
--inspect: this activates the Chrome DevTools integration, but doesn't
pause the code execution. If we just used this flag, Mocha would finish running
all the tests before we managed to connect Chrome DevTools to it! Instead,
we'll also pass the --debug-brk flag, which tells Node to pause at the
first line of execution so that we have time to connect the Chrome DevTools.
We'll add another script to the package.json file for this task, like this:
"scripts": {
  "test": "mocha --compilers babel-register",
  "test:repl": "mocha debug --compilers babel-register",
  "test:debug": "mocha --inspect --debug-brk --compilers babel-register"
}
To run this script, we call npm run test:debug, like this:
$ npm run test:debug

> learning-to-test@0.0.1 test:debug /tmp
> mocha --inspect --debug-brk --compilers babel-register

Debugger listening on port 9229.
Warning: This is an experimental feature and could change at any time.
To start debugging, open the following URL in Chrome:
    chrome-devtools://devtools/bundled/inspector.html?experiments=true&v8only=true&ws=127.0.0.1:9229/3ed5243b-3437-4ec0-a244-e36661b21fa1
As the instructions state, you should open that URL in the Google Chrome browser. The URL you get will be different every time, so don't try to use the one I've provided above: it's just an example, and it won't work for you! Once you do open the URL in Chrome, it will look something like this:

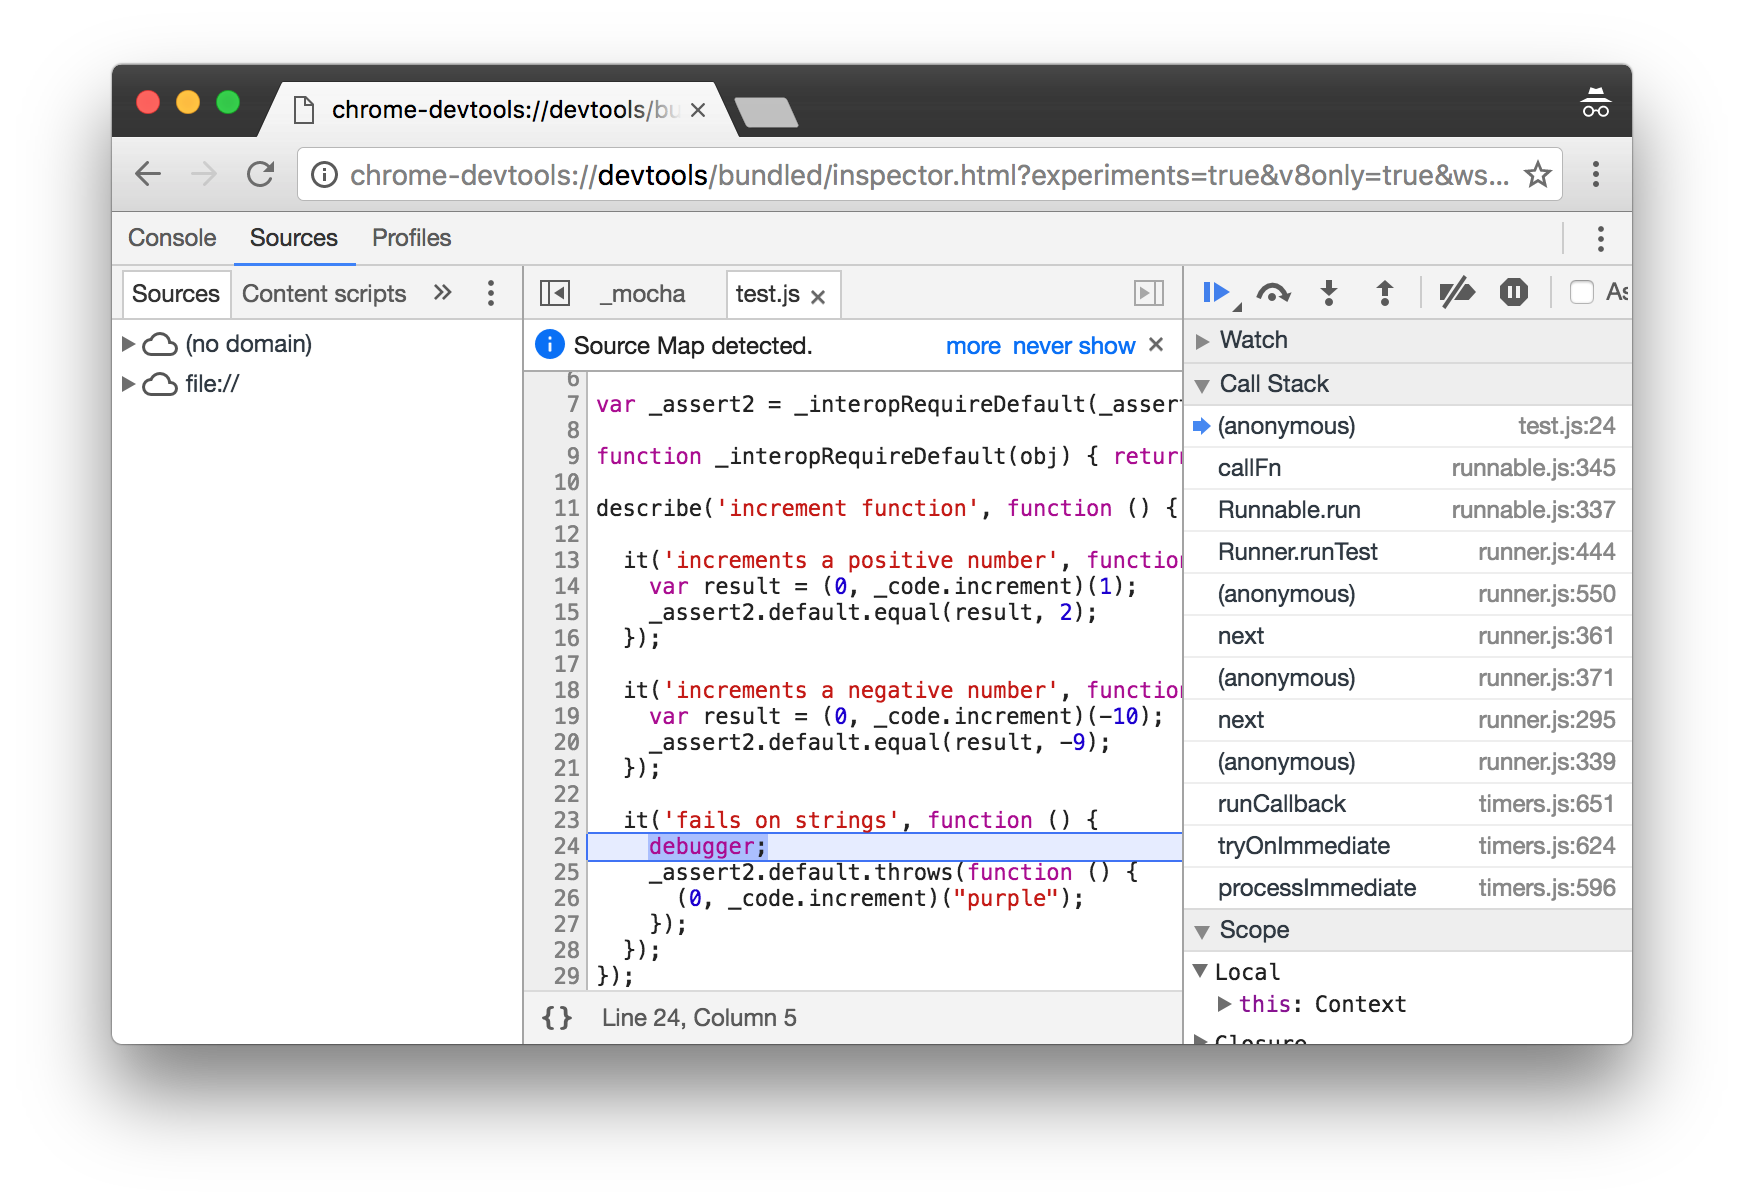
Again, we're debugging ES5 code from Babel rather than the ES6 code we wrote, but hopefully this will be improved in later versions of Node and Chrome. In spite of this, the Chrome DevTools are still the best debugging experience I've found so far for Node — not least of all because they're so familiar, from debugging front-end JavaScript code.
mocha.opts
We're calling mocha in three different ways, but there's one option that's
consistent across all of them: --compilers babel-register. One of the
principles of good software development is "don't repeat yourself", or DRY.
So, how do we avoid this repetition?
Fortunately, Mocha has a way. It will automatically look for a file called
test/mocha.opts on startup, and if it finds it, it will read the file and
treat it as configuration. In this case, we want to always configure Mocha to use
the babel-register compiler, so we can do so using this test/mocha.opts
file. Create that file with the following content:
--compilers babel-register
Then modify the scripts in your package.json file to look like this:
"scripts": {
  "test": "mocha",
  "test:repl": "mocha debug",
  "test:debug": "mocha --inspect --debug-brk"
}
Try running npm test, npm run test:repl and npm run test:debug again.
They should still work just fine! You can also add other options to the
test/mocha.opts file, and they will automatically apply to every time you
run mocha in this project. That's much DRYer!
Coverage
Once you've got your tests written and debugged, you'll want to know how much of your code is covered by tests. We'll use Istanbul to measure this code coverage. Istanbul has full support for ES6, first let's install the Babel integration, like this:
$ npm install --save-dev babel-plugin-istanbul
We also need to configure it in package.json. Find the "babel" section you
already added, and add an "env" section to it like this:
"babel": {
  "presets": ["latest"],
  "env": {
    "test": {
      "plugins": ["istanbul"]
    }
  }
}
Now that Istanbul is configured, we can run it as part of the tests. Istanbul's
command line interface is called nyc (don't ask me why), so we're going to
install that interface and use it when running the tests. First, we install it
like this:
$ npm install --save-dev nyc
Then put the nyc command in front of your "test" script, like this:
"scripts": {
  "test": "nyc mocha",
  "test:repl": "mocha debug",
  "test:debug": "mocha --inspect --debug-brk"
}
Note that I recommend not using nyc for your debugging scripts. You don't
care about test coverage when debugging, so why measure it?
Now that you've got nyc hooked up, you'll be able to see your test coverage
at the end of every test run! Try running the tests once more:
$ npm test

> learning-to-test@0.0.1 test /tmp
> nyc mocha --compilers babel-register

  increment function
    ✓ increments a positive number
    ✓ increments a negative number
    ✓ fails on strings

  3 passing (9ms)

----------|----------|----------|----------|----------|----------------|
File      |  % Stmts | % Branch |  % Funcs |  % Lines |Uncovered Lines |
----------|----------|----------|----------|----------|----------------|
All files |      100 |      100 |      100 |      100 |                |
 index.js |      100 |      100 |      100 |      100 |                |
----------|----------|----------|----------|----------|----------------|
Looks like we've got 100% code coverage, which is perfect!
Recap
So to recap, here's the situation regarding automated testing Node:
- We're using Mocha as a test framework
- We can write our JavaScript in ES6, and compile it back to ES5 using Babel
- We can debug our tests using Node's built-in debugger, or using the Chrome DevTools
- We're measuring our test coverage using Istanbul
This is how the package.json file looks after installing and configuring
all of these tools:
{
  "name": "learning-to-test",
  "version": "0.0.1",
  "description": "via davidbaumgold.com",
  "main": "index.js",
  "author": "",
  "license": "ISC",
  "scripts": {
    "test": "nyc mocha",
    "test:repl": "mocha debug",
    "test:debug": "mocha --inspect --debug-brk"
  },
  "devDependencies": {
    "babel-plugin-istanbul": "^4.0.0",
    "babel-preset-latest": "^6.22.0",
    "babel-register": "^6.23.0",
    "mocha": "^3.2.0",
    "nyc": "^10.1.2"
  },
  "babel": {
    "presets": [
      "latest"
    ],
    "env": {
      "test": {
        "plugins": [
          "istanbul"
        ]
      }
    }
  }
}
Note that the versions of the dev dependencies may be different for you, and that's OK! npm install will give you the latest version of these dependencies,
which is exactly what you want.
What other tools do you use for doing automated testing with Node?
Why do we call
npm run test:replinstead of justnpm test:repl? What's that extrarunargument for? The answer is that almost all scripts defined throughpackage.jsonneed thatrunargument. The "test" script happens to be special: if you runnpm test, it knows that you meant to runnpm run test. However, the "test:repl" script is not special: if you runnpm test:repl, it won't know what you mean.↩