
Host a Static Site on AWS, using S3 and CloudFront
Static websites are great: they're easy to create, and easy to test on your local computer. However, once you've created your static website, how do you get it on the internet? This tutorial will show you how to use Amazon Web Services to host a static website. Using these technologies, you can run a bulletproof static website that is immune to traffic spikes, at a cost of about $20 per year. You'll also learn how to get HTTPS support for your website (which every website should have), and email addresses at your website, for no additional cost!
There are many different ways to create a static website, but I recommend Lektor. It's a static content management system that makes creating a static website a breeze. Once it's set up, it's easy to create, edit, and delete content from your website, even for non-technical users! This tutorial will assume that you're using Lektor to create your site, but most of this tutorial can be applied to any static website or static site generator.
- Sign Up with AWS
- Register a Domain
- Make an S3 Bucket
- Upload to S3
- Make a CloudFront Distribution
- Point Domain to CloudFront
- Redirect Bare Domain to WWW
- Setup Email at Your Domain
- Setup HTTPS
- Finished!
Sign Up with AWS
Amazon Web Services, or AWS, is the most popular cloud computing environment today. It has many different services that can be used together or separately, and because you only pay for what you use, it's very inexpensive to get started.
The first step is to sign up for an AWS account, by going to aws.amazon.com and clicking on the button that says "Create a Free Account". If you already have an account with Amazon.com (the shopping website), you can put in the username and password that you use for Amazon.com, since Amazon.com and AWS are run by the same company.
Note that you'll need to verify your AWS account with a phone number as part of this process. You'll be asked to put in your phone number, AWS will call your phone, and you'll need to enter a PIN to verify that you own that phone number. You'll also need to set up a payment method, so that AWS can bill you for the services you use.
Once you've signed up with AWS, you can access the AWS Console at console.aws.amazon.com. I've included a screenshot so you can see how it looks, but it's in the process of being redesigned. The first picture is the new version, the second picture is the old version.


Yes, there's a lot of links there — and AWS keeps releasing new services, which makes the page even more overwhelming. Fortunately, you're only going to use four services in this tutorial: S3, CloudFront, Route 53, and Certificate Manager.
Register a Domain
To host your static site on AWS, the first thing you need to do is register a domain for it. A domain is the first part of the URL that you type in to access your site, often ending in ".com". (That ".com" part is called a top-level domain, or TLD. There are many different TLDs, but ".com" is the most well-known.)
"Registering" a domain basically means claiming ownership of it for a specified period of time, usually one to five years. There's a big, global network called the Domain Name System, or DNS, which determines who owns which domains. You cannot claim ownership of a domain forever, but you can claim ownership for several years at a time, and keep extending that claim over and over again as many times as you want. That's how big companies keep their websites running for years at a time -- but if someone forgets to renew the domain before the ownership expires, it gets released and anyone else can register it. (Yes, this has happened to some companies!)
In order to register a domain in the DNS, you have to go through a "registrar" (which is a company that helps run the global DNS network), and you have to pay a fee to to that registrar. Usually, this fee is around $10 per year that you are claiming ownership of the domain, but different registrars charge different amounts. As you might expect, AWS is a domain registrar, and in order to register a domain with AWS, you need to use the service called "Route 53".
Go to the AWS Console and click on "Route 53", under the "Networking" section. Then go to the Domain Registration section, click on the "Register Domain" button, type in the domain you want to register, select the TLD that you want to use, and click "Check". The pages should look like this:


When you click on the "Check" button, Route 53 will check DNS to see if someone else has already claimed that domain. If so, you'll have to try a different name. There's a handy website called Domainr that can help you find variations on the name you were hoping for. Unfortunately, most short, simple domain names are already taken, so you'll probably need to get a bit creative.
Once you've found an available domain that you like, add it to your Route 53 shopping cart and click "Continue". On the next page, you can select how many years you want to register the domain for: the longer you claim it, the more it will cost. You are also required to put in contact information for whoever owns and controls this domain. If you are buying this domain to host a personal website, you should put in your own contact details. If you are buying this domain on behalf of a company, you should put in the contact information for the company itself.
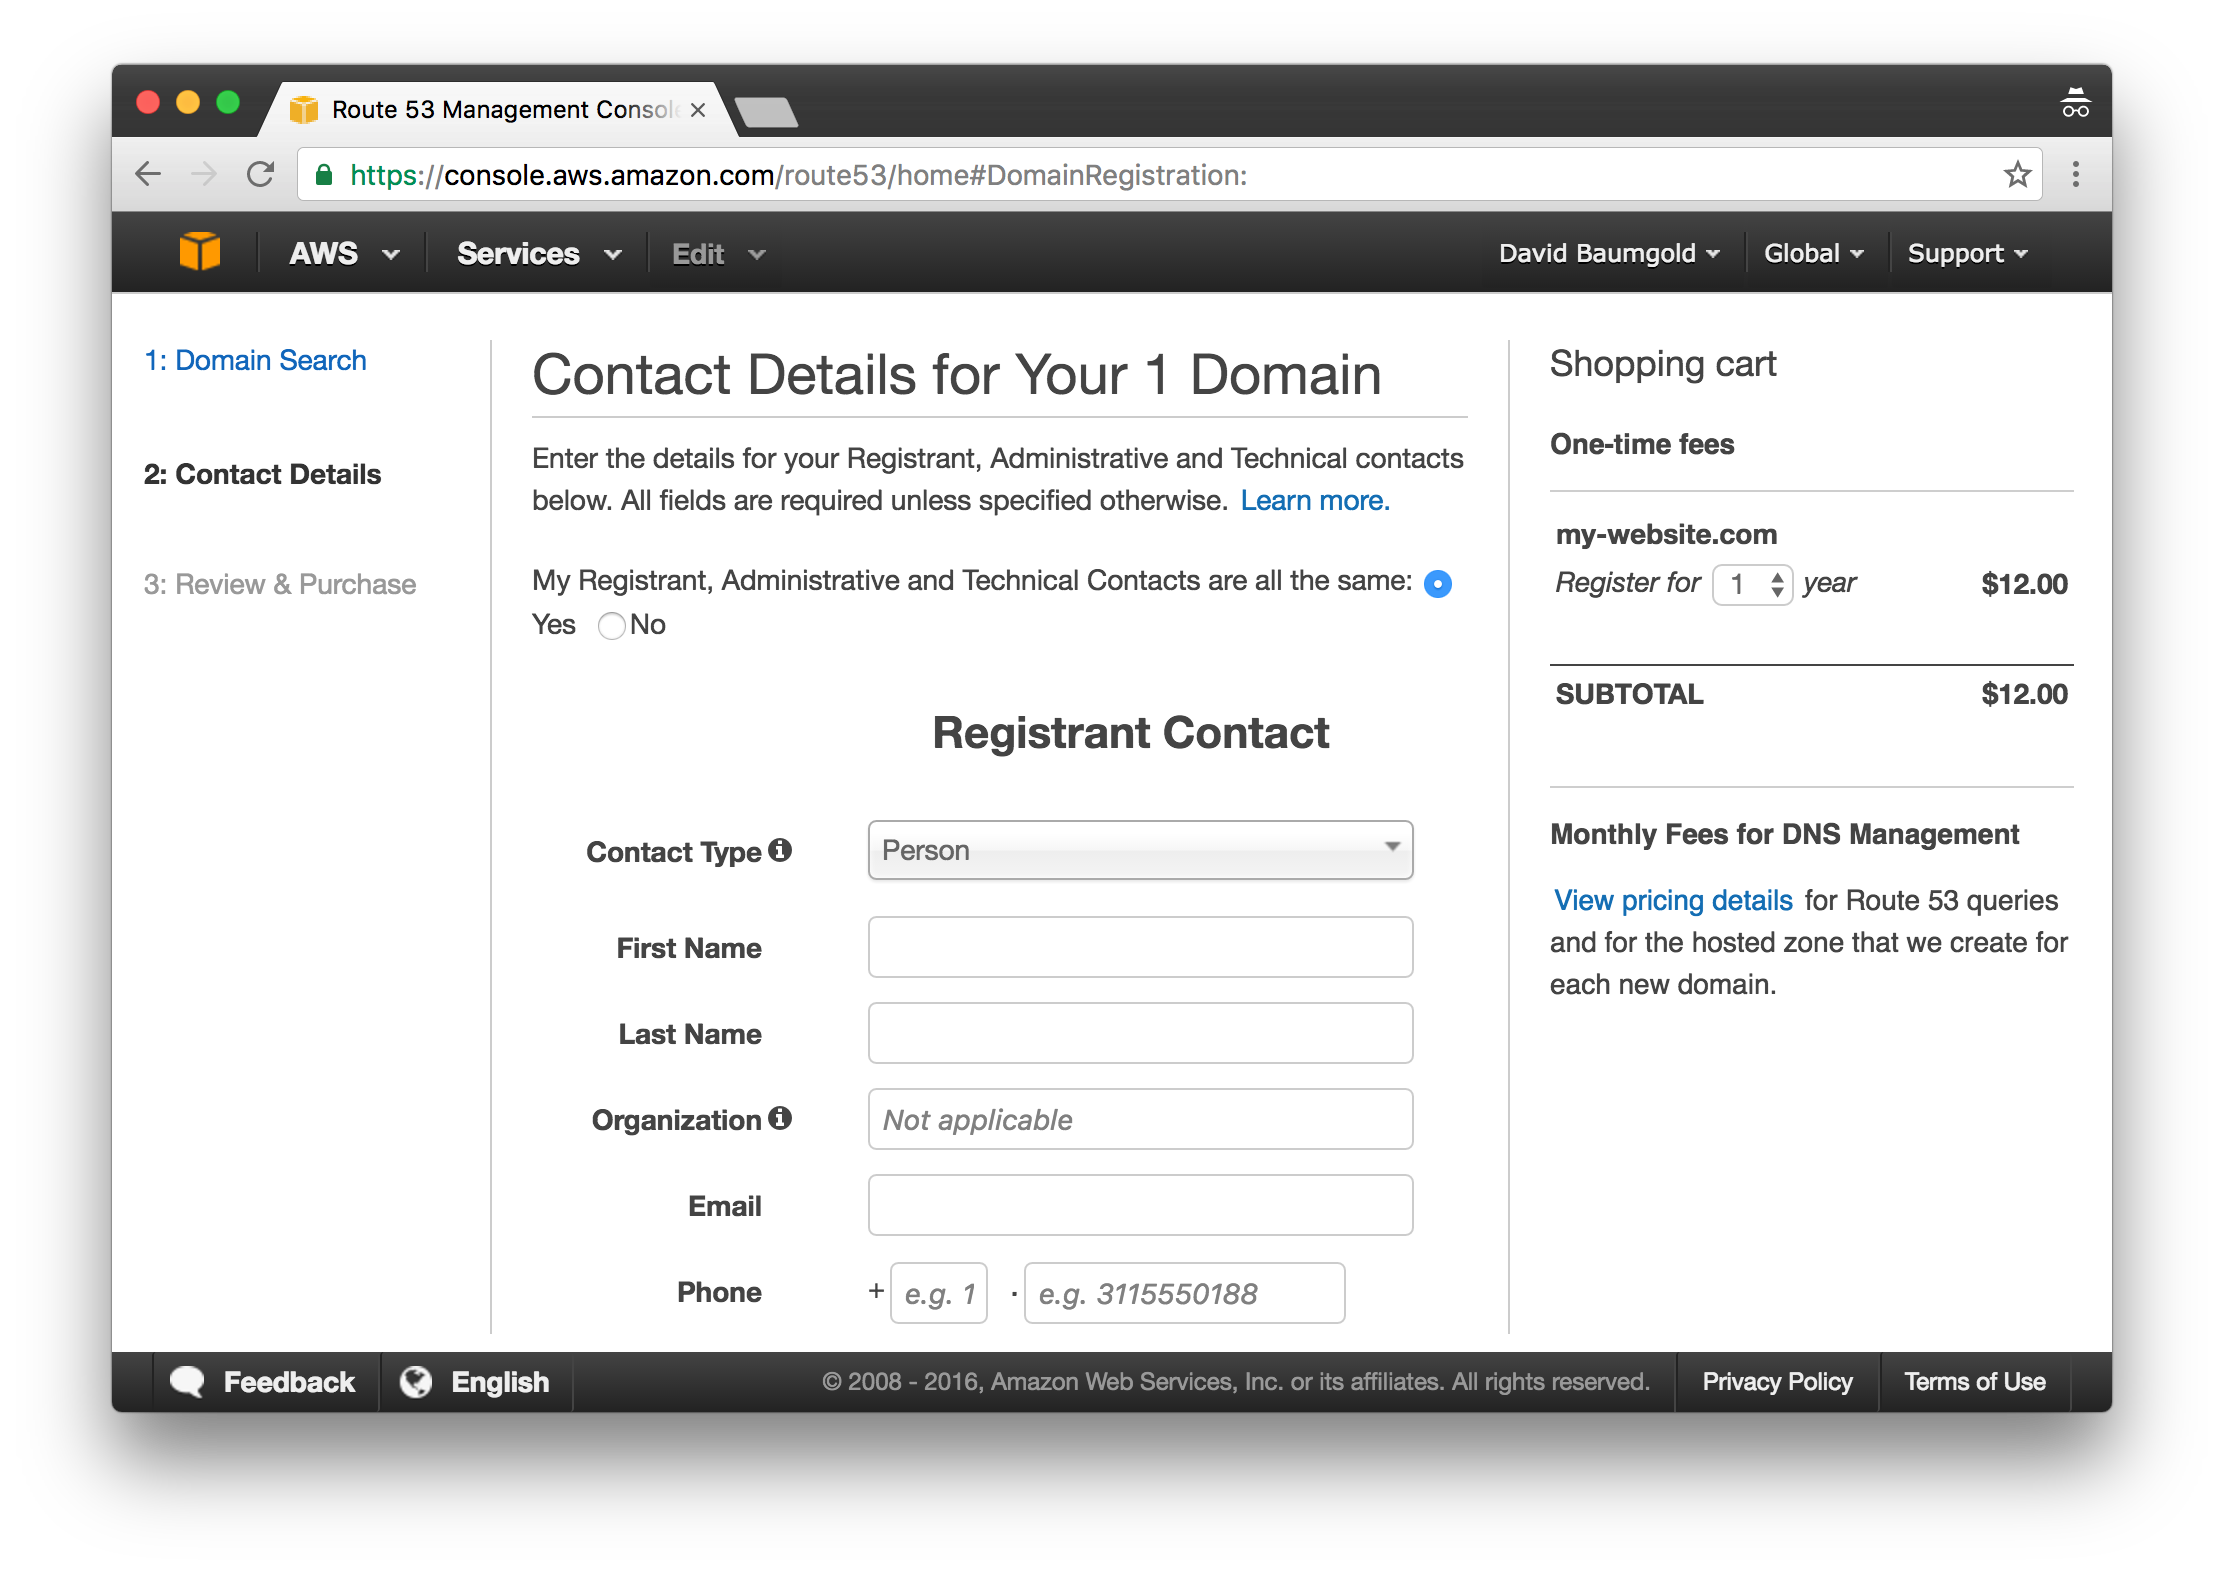
Note that any contact information you put into this form will be publicly visible unless you enable Privacy Protection for your domain, at the bottom of the contact form. If you are putting in your own contact information, be sure to enable Privacy Protection if you don't want everyone in the world knowing your home address.
When you've put in the contact information, click Continue. Review your information, check the "Terms and Conditions" check box, and click "Complete Purchase". Well done, you now own your first domain!
Make an S3 Bucket
You've taken the first step, but there's still a lot to do. The domain is basically a pointer that tells computers how to get to your website, but you don't have a place to point those computers to yet. That's where S3 comes in. S3 stands for "Simple Storage Service", and it's going to hold the HTML files that make up your static website. Conceptually, we're going to deploy your website in three parts. S3 will hold the files that make up your website, CloudFront (which we'll get to later) will serve those files out to the internet, and your domain will point to CloudFront so that people can find your website on the internet. Let's take it one step at a time, and start with S3.
In order to use S3, you have to create something called a "bucket". Like a literal bucket, it exists to hold things. S3 uses these buckets to organize different kinds of data and keep them separate from each other. Just like you wouldn't store your baby photos and your tax returns in the same place, you would use different S3 buckets to hold different kinds of data. You can have lots and lots of buckets if you want, and the buckets themselves are totally free. (Storing data inside of these buckets costs a tiny bit of money, but it's almost free: we're talking about fractions of a penny. Also, the only way to have S3 hold your website is to put it inside of a bucket.)
Go to the AWS Console and click on "S3", under the "Storage & Content Delivery" section. Then click on the "Create Bucket" button. It should look like this:


S3 will ask you to pick a name for your bucket. This is important:
you must name your bucket with the exact domain name that you want
your site to be available at.
For example, if you want your website to be available at www.my-website.com,
and you own the my-website.com domain, then the bucket must be named
www.my-website.com precisely.
Note that it is not strictly required to include the "www" at the front of your URL, but it's a good idea if you think there's any chance that your website will grow to a massive size in the future. There are arguments for the www and against the www, but this tutorial will assume that you are using the "www".
You will also need to select a region for your bucket. This doesn't really matter, but I recommend that you select "US East (N. Virginia)" because it's the cheapest and most popular option.
Click the "Create" button, and S3 will create your bucket! Next, you'll need to modify some properties on the bucket to make it hold your website correctly. Click on the row of the bucket you just created, and the details pane will open on the right side of the page. Then click on the "Properties" section of the page to modify the bucket properties. It should look like this:


On the properties page, click on the "Static Website Hosting" section to tell S3 that you want to use this bucket to host a website. You'll need to set names for your index document and your error document; the default values of "index.html" and "error.html" should do fine, so type them in, and then click the "Save" button.
Do you see the "Endpoint" URL at the top of this form? It should look
something like
http://www.my-website.com.s3-website-us-east-1.amazonaws.com.
This URL is very important, and we'll come back to it later.
Next, you need to change the permissions on this bucket so that all the files in this bucket can be viewed by anyone. To do this, we're going to use something called a "bucket policy", which tells S3 how you want it to treat the contents of the bucket. This bucket policy is written in a special JSON-based format, and you don't need to understand the details of how it works -- it's very complicated. (You can read Amazon's documentation if you want, though.)
After you save the static website hosting form, scroll back up to the top of the page and click on the "Permissions" tab, to the right of the "Properties" tab. Then, click on the big "Bucket Policy" button, right below the tabs. You'll see a big text box, marked "Bucket policy editor". Copy-paste this text into the bucket policy editor:
{
  "Version": "2008-10-17",
  "Statement": [{
    "Sid": "AllowPublicRead",
    "Effect": "Allow",
    "Principal": {"AWS": "*"},
    "Action": ["s3:GetObject"],
    "Resource": ["arn:aws:s3:::www.my-website.com/*"]
  }]
}
In the line that starts with "Resource", you'll need to replace
www.my-website.com with the name of your bucket. Then click the "Save"
button. It should look like this:
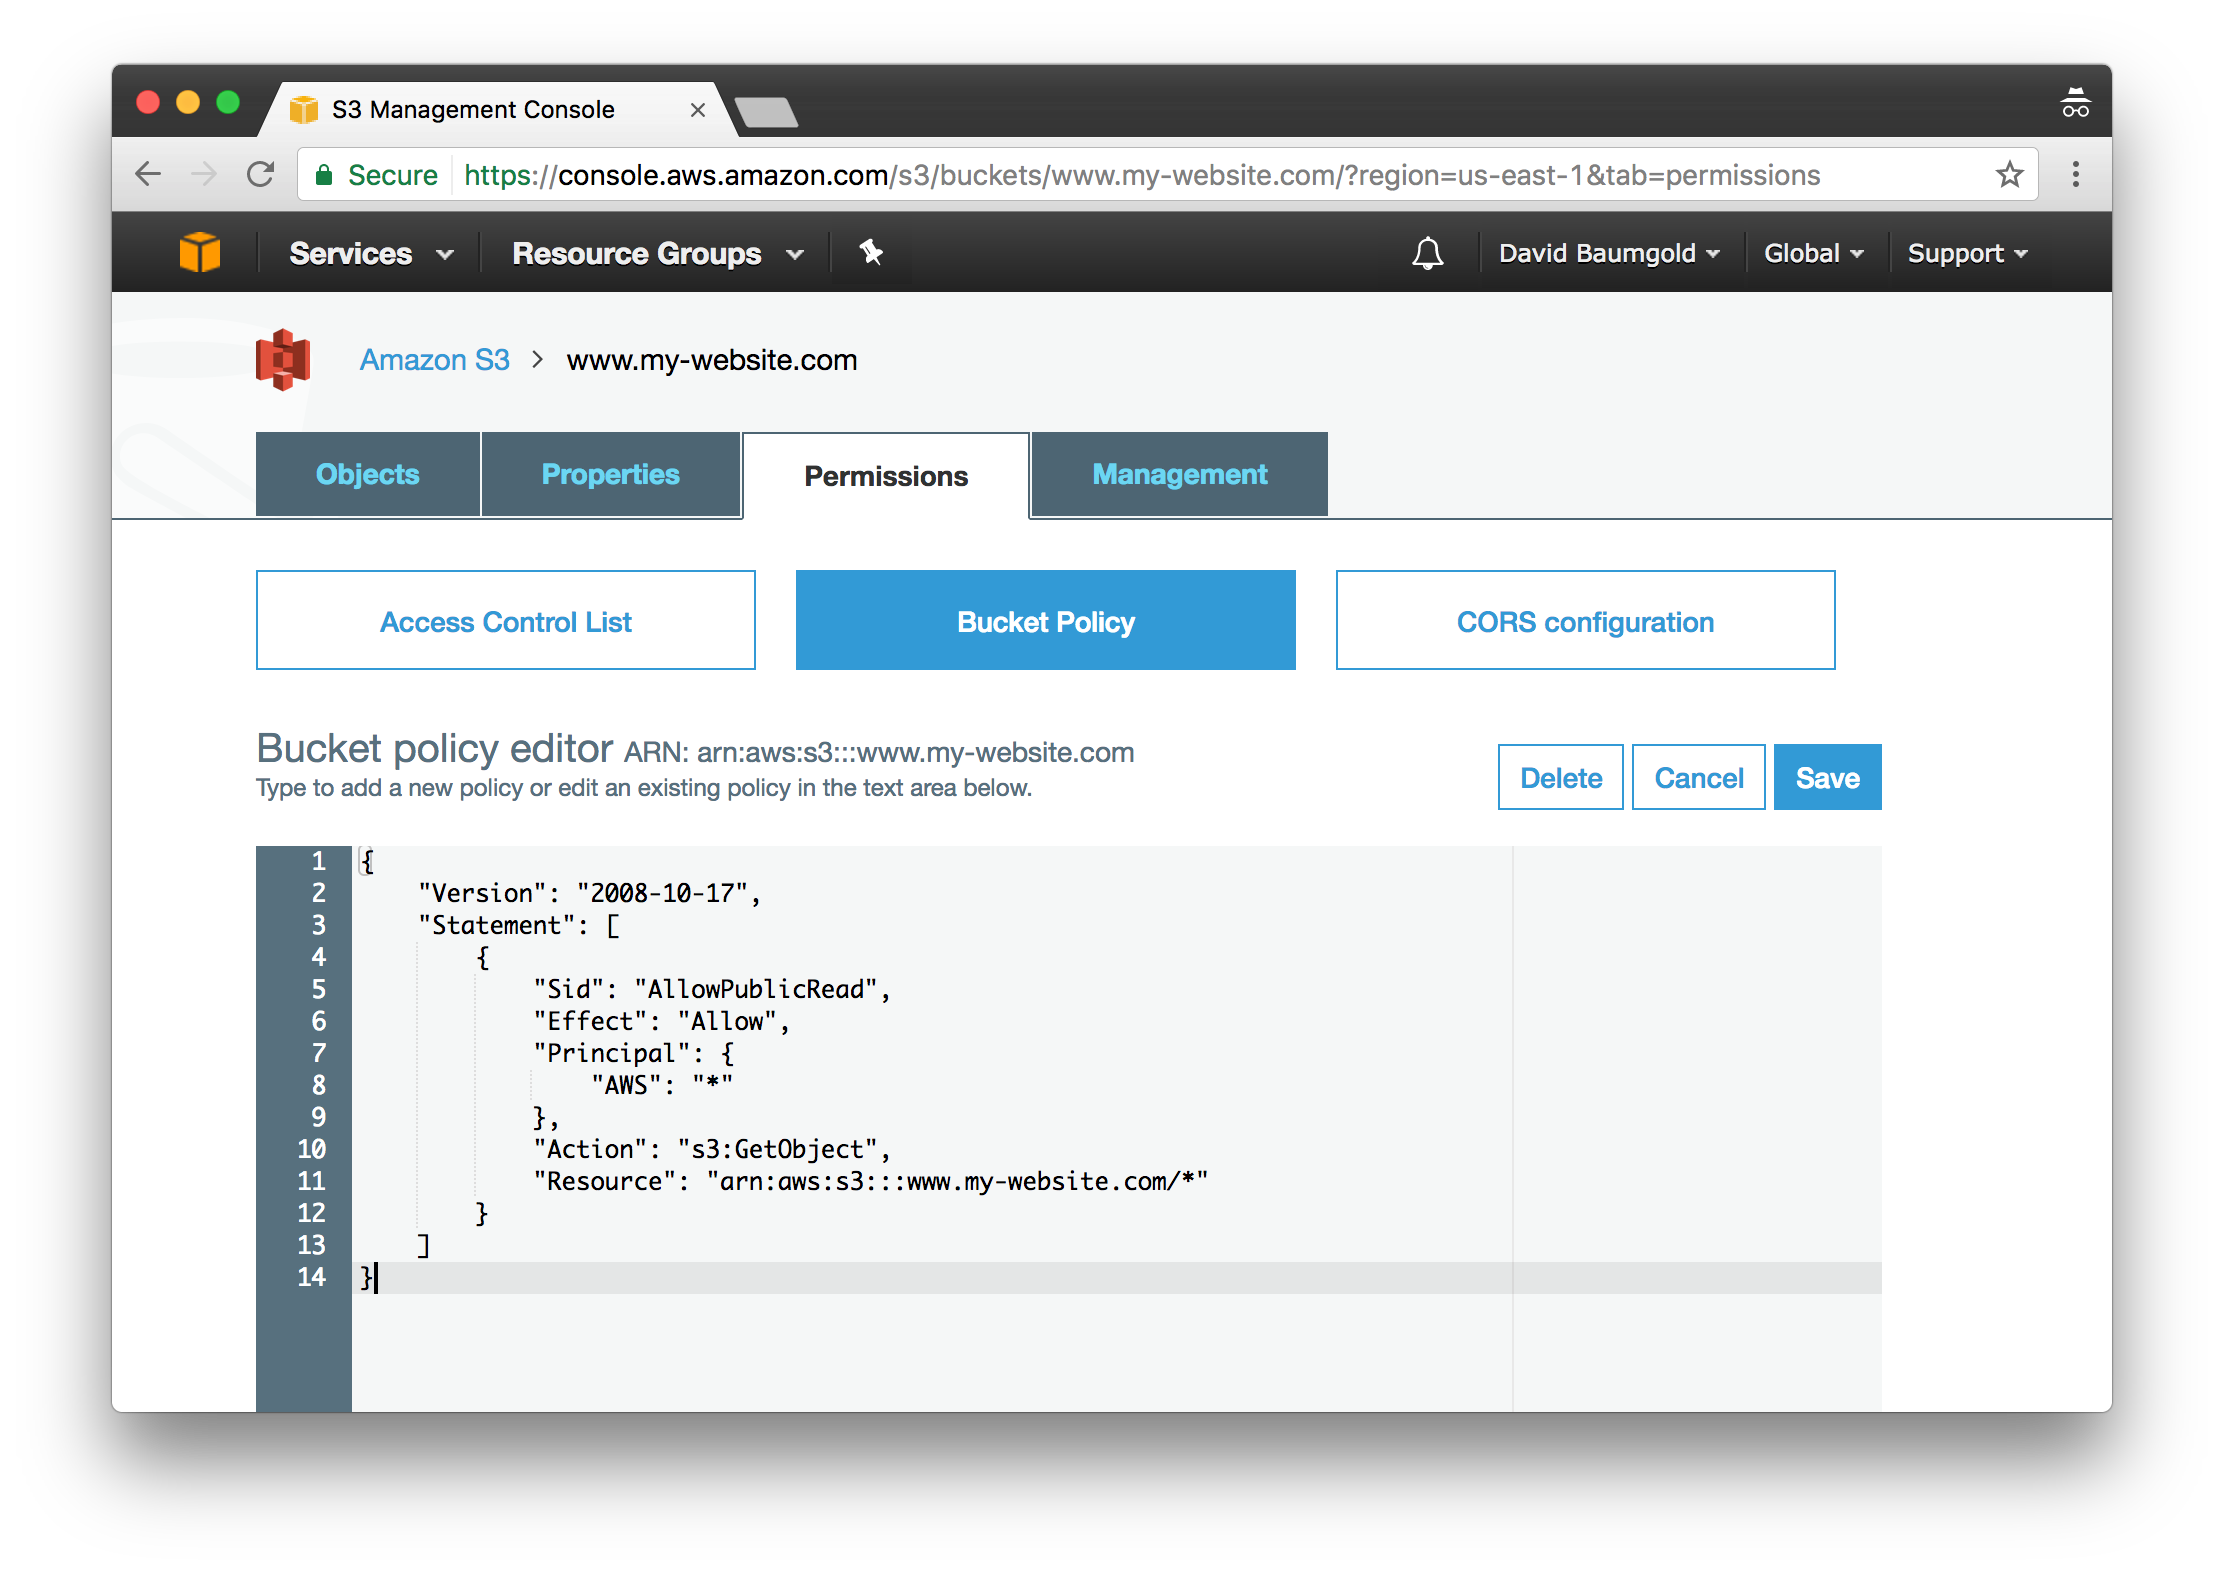
Note that Amazon might reformat the bucket policy, so it has different spacing. Notice how the spacing in the screenshot is different from the spacing of the text above. That's totally fine — the spacing of the bucket policy doesn't matter at all.
Great, your S3 bucket is all set to host a website! In fact, that "Endpoint"
URL that you saw earlier is one way that people will be able to access your
site. However, there are two problems. One, this URL is very long and ugly:
http://www.my-website.com.s3-website-us-east-1.amazonaws.com is not exactly
a memorable name. And two, your bucket still doesn't have any HTML files in
it! Fortunately, both problems can be fixed.
Upload to S3
The next step is to upload your HTML files to S3. In this tutorial, we'll assume you're using Lektor to generate your HTML files, but you can use whatever system you want (or even write your HTML files by hand).
If you're using Lektor, you need to configure Lektor to upload your HTML files to S3 every time you re-deploy your website. Fortunately, the lektor-s3 plugin makes this a lot easier, but you still have to set it up properly, so that it works with the bucket you just created.
First, add the plugin to your project by running this command while sitting inside your Lektor project directory:
$ lektor plugins add lektor-s3
Next, open up your .lektorproject file in a text editor and
add a new section to hold information about the S3 bucket you created.
It should look like this:
[servers.s3]
name = S3
enabled = yes
default = yes
target = s3://www.my-website.com
You'll need to change the target to refer to your bucket name, rather than
leaving it as www.my-website.com. Don't forget to keep the s3:// in front
of the bucket name.
Next, you need to find your AWS credentials. "Credentials" just means "proof that you are who you say you are", and for many websites, you can use your username and password as credentials. However, AWS does things differently, and requires that you use an "Access Key ID" and a "Secret Access Key", instead. You can generate multiple sets of credentials, and each set can have different permission levels, which can make your AWS account more secure. However, for the sake of simplicity, this tutorial won't go into generating new sets of credentials, and instead will stick with your default, full-permissions credentials.

At the top right corner of every page of the https://console.aws.amazon.com">AWS Console, your name will appear with a little arrow next to it. Clicking on your name will reveal a dropdown menu with only a few items. One of those items is "security credentials", which is what you want to click on.
You'll end up on a page that lists several options for security credentials, and a warning will immediately pop up, informing you that you should create users with limited permissions. That is beyond the scope of this tutorial, so dismiss the warning by clicking on "Continue to Security Credentials".


Click on the "Access Keys" item in the list, and you'll see a list of your existing access keys. If you've never used AWS access keys before, this list will be empty. Click on the "Create New Access Key" button, then click on "Show Access Key" once the access key has been created. The "Access Key ID" will be a long jumble of letters and numbers, and the "Secret Access Key" will be an even longer jumble of letters and numbers.


This is important: once you leave this page, you will never be able to download or view the secret access key again! Make sure that you save it to your computer! If you don't, and you need it later on, you'll have to delete it and create a new one instead.
Now you need to save this information to a place on your computer that
lektor-s3 can use it. In your home
directory, create a directory called .aws. Inside of that ~/.aws directory,
create a file named credentials, with the following contents:
[default]
aws_access_key_id=MYACCESSKEYID
aws_secret_access_key=MySecretAccessKey12345
You'll need to change these values to refer to your Access Key ID and Secret Access Key, instead of using the example values here.
Once you've created the ~/.aws/credentials file with the correct contents,
Lektor should be able to deploy your website's HTML files to the S3 bucket
you created. Give it a try, by cd-ing into your Lektor project, and
running:
$ lektor build && lektor deploy
Once it's finished, go back to the AWS Console, click on "S3", and click on your bucket. You should see several files and folders in there! If you click on the "Properties" button in the toolbar at the top, click on the "Static Website Hosting" section, and click on the "Endpoint" URL, you'll see your website! Huzzah!
Make a CloudFront Distribution
You've made great progress, but you're not done yet. The next step is to use CloudFront, Amazon's Content Delivery Network (CDN) service. This will do two things: make your website load fast anywhere in the world, and allow you to use HTTPS, the secure version of HTTP.
Just like S3 is organized into "buckets", CloudFront is organized into "distributions". You need to create a distribution for your website and point it at your S3 bucket, so that it gets the same contents as your S3 bucket. Once that's up and running, we'll go back to Route 53 and make the domain you bought point to the CloudFront distribution, so that people who type in your URL can get to your website.
Go back to the AWS Console and click on "CloudFront", under the "Storage & Content Delivery" section. Click on the "Create Distribution" button to get started, and select that you want a Web distribution, instead of RTMP.


The next page will be a long form where you can specify many different options
for your distribution. Don't worry, you can leave most of these options at
their defaults, but there's a few we need to change. The first one is the
"Origin Domain Name" — it's the very first field in the form. Click on it,
and Amazon will show a dropdown menu with your S3 buckets listed! Unfortunately,
this dropdown menu is misleading: the URL in the dropdown menu is not the URL
that you want to use.1 Instead, go back to your S3 bucket,
find the website endpoint URL in the "Static Website Hosting" section of the
properties, and paste that into the "Origin Default Name" field. You'll need to
remove the http:// from the front. It should
look something like www.my-website.com.s3-website-us-east-1.amazonaws.com.


Next, scroll down to the "Distribution Settings" section. Just above it, there's a field called "Compress Objects Automatically": set that to "Yes". Slightly below that, there's a field called "Alternate Domain Names (CNAMEs)". Put the domain of your website into the CNAMEs field: for example, "www.my-website.com". This should match the name of the S3 bucket you're using. Finally, scroll down to the bottom of the form, find the "Default Root Object" field, and type in "index.html". Then click "Create Distribution".


AWS will start creating your CloudFront distribution, which takes a few minutes to complete. You can see that this screenshot shows that it's still in progress.

If you're using Lektor, you should also tell
lektor-s3
about your CloudFront distribution. Every distribution is assigned an ID that
is a mix of capital letters and numbers — there's a column for it in the
distribution table on the CloudFront website. (It's mostly hidden in the
screenshot above, but you can see the first few characters peeking out.)
Copy the ID for your distribution, and add it to the [servers.s3] section
of your .lektorproject file. For example, if your CloudFront distribution
ID was E19DK4O4YV8F1Y, your .lektorproject file would look like this:
[servers.s3]
name = S3
enabled = yes
default = yes
target = s3://www.my-website.com
cloudfront = E19DK4O4YV8F1Y
Point Domain to CloudFront
Now that you have your website up and running on both S3 and CloudFront, the next step is configuring that domain you bought to point at it! To do this, we have to go back into Route 53, so go back to the AWS Console and click on Route 53. Then click on your domain, and click "Manage DNS".


On that screen, you need to add a new record set to point your domain to the CloudFront distribution. Click "Create Record Set", then type "www" into the "Name" field and select "A" for the "Type" field. Just beneath that, there's an "Alias" field with two options: select "Yes", which will cause the "Alias Target" field to appear.


When you click on the "Alias Target" field, Amazon will show another helpful dropdown menu, with entries for both S3 and CloudFront. Select the CloudFront distribution you just created, not the S3 bucket. Then click the "Create" button.
Whenever you make changes to DNS, those changes don't apply immediately. DNS uses a technique called caching to avoid overloading the system, and one of the downsides of caching is that it can take a little while for the system to notice changes. When you make a DNS change, it can take anywhere from 5 minutes to 1 hour for it to apply.
Type your domain into your web browser, with the "www" in front, and see if your website shows up. If not, wait a little while and try again — it shouldn't take longer than an hour. Once it works, celebrate! You have a website!
Redirect Bare Domain to WWW
Your website works, but only if you include the "www" in front — if you try to visit your domain without the "www", it will fail, which is very confusing for people trying to visit your site. A domain without a "www" is called a "bare domain", and the correct way to fix this is with something called a "bare domain redirect". With a bare domain redirect in place, if someone tries to visit your site without the "www", they will be automatically rerouted to the "www" domain, so that the website works without the user having to do anything. Setting this up is pretty straightforward, and it uses the same three services you've already used: S3, CloudFront, and Route 53.

Go back to the https://console.aws.amazon.com">AWS Console
and click on S3.
Make a new S3 bucket named after your domain without the
www. If your domain is my-website.com,
then the bucket should be named my-website.com.
(Once again, region doesn't matter, but "US East" is probably
a good choice.) Click on this newly-created bucket to open the details pane,
click on the "Properties" section, and then click on the
"Static Website Hosting" section on the bucket properties page.
In the static website hosting form, select the "Redirect requests" option.
For the "Target bucket or domain" field, put in the name of your other
S3 bucket that does have the www in there.
Then click the Save button to save your changes.
Next, we need to make a CloudFront distribution for this redirect bucket. Go back to the AWS Console and click on CloudFront. Create a new CloudFront distribution just like before, but this time, put the URL for your bare domain S3 bucket in the "Origin Domain Name" field. Remember, the dropdown menu for this field is misleading: copy-paste the website endpoint URL from the static website hosting form, instead of selecting the S3 bucket from the dropdown menu. You should also put the bare domain in the "Alternate Domain Names (CNAMEs)" field. Everything else is the same: still a web distribution rather than RTMP, and you can still leave most of the fields at their default values.
Finally, we need to set up this CloudFront distribution in DNS. Go back to the AWS Console and click on Route 53. Add a new record set for your domain, but this time, leave the name blank. This is how Route 53 knows the record should apply to the bare domain, instead of the "www". Just as before, the record should be of type "A", with "Alias" set to "Yes". Select the CloudFront distribution that you just made for the bare domain, and the click "Create".
Once again, this change will take anywhere from 5 minutes to 1 hour to take effect. Once it does, visiting the bare domain in your web browser will automatically redirect you to the "www" subdomain!
Setup Email at Your Domain
When you own a domain, you can make email addresses on that domain, as well! Not only is this really cool, it's also a way of verifying that you own the domain. We'll need this in order to set up HTTPS on your website.
In order to setup email on your domain, you'll need a "hosted email service", which is a service that handles sending and receiving email for you. AWS offers a hosted email service called WorkMail, but it costs $4 per user per month, which is expensive! There are many hosted email services out there, and they all have different price ranges and feature sets. However, I recommend Migadu because they have a free plan.
Create an account on the Migadu website2, and you'll automatically be set up on their free plan. (Their paid plans are very reasonable, but the free plan has everything you need and then some.) Once you're signed in, add your domain to Migadu, and be sure to check the checkbox for creating recommended RFC email addresses.


Configure DNS for Email
In order to use Migadu's hosted email service, you need to tell everyone in the world that when email is sent to your domain, it should really go to Migadu's email service. DNS can handle that, and we're using Route 53 to handle DNS, so we're going to select "External DNS" (because Route 53 is external to Migadu). Once you do that, Migadu will tell you exactly how to configure Route 53 so that everything works right. You'll need four different kinds of DNS records: MX, SPF, DKIM, and DMARC. It sounds complicated, but we can take this step by step!
Open a new tab in your browser, go back to the AWS Console and click on Route 53. We're going to add a few new record sets, just like we did with CloudFront. Let's start with the MX record set.


As Migadu's instructions explain, MX records are what declare that your email should go to Migadu's email service. Leave the "name" field blank, and select "MX" from the type dropdown menu. Set the TTL to 3600, and copy-paste the value from Migadu's instructions into the "value" field in Route 53. Then click the "Create" button.
If spam didn't exist, MX records would be all you need — but it does, and the other DNS records that Migadu wants you to set up are designed to make it more difficult for spammers to use Migadu. (It's protection for you, and for Migadu!)


SPF is a bit misleading with Route 53. The "type" dropdown menu includes an "SPF" option, but don't use it. Use the "TXT" type instead, like Migadu's instructions say. Leave "name" blank, set the TTL to 3600, and copy-paste the value from Migadu's instructions into the "value" field. When you click outside the "value" field, Route 53 will automatically put quotation marks around what you've pasted in, which is totally fine. Click "Create" again.


DKIM is straightforward. Set the "name" field to "default._domainkey", and select the "TXT" record type again. Set the TTL to 3600. Copy-paste the value from Migadu's instructions into the "value" field. Note that your value will be different from the one in the screenshots above! If Route 53 puts quotation marks around the value, that's fine. Click "Create" again.


DMARC is straightforward, as well. Set the "name" field to "_dmarc", and select the "TXT" record type again. Set the TTL to 3600. Copy-paste the value from Migadu's instructions into the "value" field. Note that your value will be different from the one in the screenshots above! If Route 53 puts quotation marks around the value, that's fine. Click "Create" again.
Great, you've made all the necessary DNS changes! Now, you just need to wait for these DNS changes to apply. Just as before, it could take anywhere from 5 minutes to an hour. You can visit Migadu's "Health Check" page to see if it's ready. Once it is, you can move on.
Check Email on the Web
Now that the DNS is all setup, you'll need to set up email addresses at your
domain. You should already have an "admin" email address set up
(admin@my-website.com), which is the email address we want to use. However,
you need to set a password for this email address before you can use it.
In the settings for your domain, click on "Mailboxes", then "Administrator",
then "Password", and you'll be able to set a password. You can use the same
password as your Migadu account if you want, or you can pick a different one.


Once the admin email address has a password set, you can log into the webmail interface. Go to webmail.migadu.com and log in with the admin email address at your domain, and the password you just set for that admin email address.
Now you should be able to send and receive email at your domain! Try sending an email from a different email address to the admin email address at your domain, and make sure it shows up in the Migadu webmail interface. Try sending an email from the webmail interface to a different email address, and make sure it arrives properly. You can even hook up your own mail client to Migadu, like Microsoft Outlook or Apple Mail, and send and receive email on your own domain without ever using the Migadu website! Check out Migadu's documentation to learn more.
Setup HTTPS
Now that you have a working website over insecure HTTP, and you can receive email at your domain, you are finally able to set up secure HTTPS for your website! Every website should use HTTPS for security.
To do this, we're going to use a new AWS service, called Certificate Manager, or ACM. HTTPS relies on something called a "certificate", which used to be very difficult and expensive to get before ACM came along. Now, all you need to do to get a HTTPS certificate is indicate which domain (or domains) you want HTTPS on, and click a link in an email to verify that you own those domains. Once you have your certificate, you can give it to CloudFront, and then CloudFront can handle HTTPS!
Go back to the AWS Console and click on "Certificate Manager", under the "Security & Identity" section. Then click on the "Request a certificate" or "Get started" button, and you'll be asked to put in the domain names that you want the certificate to apply to. Put in your domain name twice: once with the "www", and once without it. You'll need to click the "Add another name to this certificate" button to get a second line to show up.


Review your domains on the next screen, and click the "Confirm and request" button. When you do that, Certificate Manager will send an email to a few special email addresses on your domain, including the "admin" email address you set up. Go to Migadu and check the inbox for your "admin" email address. When you receive the email from Amazon Certificates, click on the approval link, and you'll have your certificate!
Once you've got your certificate, you need to give it to CloudFront so it can use it. Go back to the AWS Console and click on CloudFront. You have two distributions, one for the bare domain and one for "www": you'll need to make the same change for both.
Pick one of your distributions and click on the distribution ID to get a detail view of the information for that distribution. Then click the "Edit" button at the top of the page to modify those details. You should see a field called "SSL Certificate", which is set to "Default Cloudfront Certificate" by default. Switch that to "Custom SSL Certificate" instead, and select the certificate you just created from the dropdown menu. Then scroll down to the bottom of the page and click "Yes, Edit" to save your changes.


Next, click on the "Behaviors" tab, select the only item in the list of behaviors by checking the checkbox at the far left, and then click the "Edit" button. Find the "Viewer Protocol Policy" field, and change it from "HTTP and HTTPS" to "Redirect HTTP to HTTPS". Then scroll down to the bottom of the page and click "Yes, Edit" to save your changes.


Don't forget to make these edits to both CloudFront distributions!
Finished!
You're all done! You should now have a working static website, hosted on AWS, which uses HTTPS for all connections. You even have hosted email at your domain, as a bonus!
Updating your website is easy, as well, but there is one minor downside: it will take a few minutes for updates to appear, because of the way that CloudFront works. New pages should show up instantly, though. Either way, updating is simple: just update the files in your S3 bucket. If you're using Lektor, updating your website is as easy as clicking the "Deploy" button -- lektor-s3 will upload your files to the correct place automatically. Once the files are updated in S3, CloudFront will pick them up automatically (after a small delay), and your domain and HTTPS certificate will continue to work seamlessly.
As for costs, we can break down the annual price like this:
| Item | Annual Cost | Notes |
|---|---|---|
| Registering a domain | $12.00 | For a .com domain. Other TLDs may cost different prices. |
| Route 53 Hosted Zone | $6.00 | Charged at $0.50 per month. This is for hosting DNS for your domain. |
| Content & Bandwidth | negligible | Typically a few cents per month, even for medium-size sites. |
That's right: weird as it sounds, the vast majority of your costs come from having your own domain! The actual content of your website, as well as the bandwidth used to send your content to your viewers, are almost free. This means that even if your website gets ridiculously popular, you probably won't pay more than $20 per year to have your website hosted on S3 and CloudFront.
Questions? Suggestions? Is something in this tutorial not working properly? Add a comment below, or contact me and let me know! (My contact information is at the top left corner of every page of my website.)
Amazon shows the REST API endpoint in this dropdown menu, rather than the website endpoint. These two URLs work similarly, but there are a few important differences. For example, if you try to access a page on your website that doesn't exist, the website endpoint will return a 404 Not Found page, while the REST API endpoint will return an ugly XML error. Check Amazon's documentation to learn all the differences between these two URLs.↩
This is a referral link for Migadu. If you sign up for a Migadu account using this link, and then later decide that you like them so much that you want to upgrade to a paid plan, then Migadu will send me a bit of money for referring you to them. It doesn't cost you anything extra at all, and it's a great way to say "thank you" if you found this tutorial useful! So if you decide to sign up for Migadu, please use my referral link!↩